.webp)
Visa rejections ruin vacations. Learn the top 7 biometric mistakes—from 'The Shadow Trap' to 'Jewellery Glare'—that cause Indian Passport and US Visa rejections.
There is nothing worse than waiting 4-6 weeks for an Indian Passport renewal or a US Visa appointment, only to get a rejection letter stating: "Photo does not meet biometric standards." It delays your trip, costs you re-application fees (often ₹1,500 - ₹12,000), and adds immense stress.
Taking your own photo at home is easy, cheaper, and safer. But getting it right requires more than just a selfie. Biometric standards are strict algorithms, not artistic contests. Here are the 7 most common mistakes we see people make when submitting DIY photos for US Visas, Schengen Visas, and Indian Passports—and specifically how to avoid them.
Mistake #1: The "Shadow Trap" (Lighting)
The Error: You stand too close to a wall, and the flash creates a hard, dark shadow outline behind your head. Or, window light hits one side of your face, leaving the other side in darkness (Rembrandt lighting).
Why it's rejected: Biometric scanners need to clearly define the edge of your face to measure cranial width. Shadows look like 'data' to a scanner, blurring the boundary between 'Ear' and 'Wall'.
The Fix:
- Step Away: Stand at least 3 feet away from the wall. This drops the shadow to the floor behind you, hidden by your body.
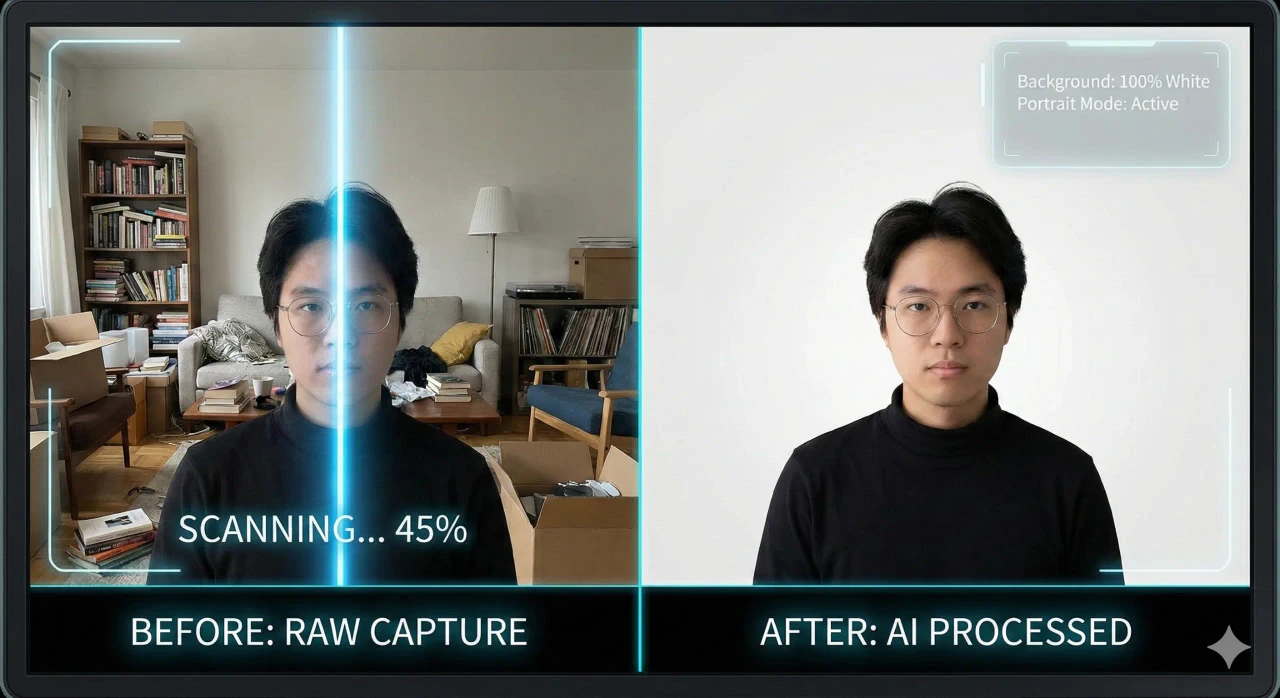
- Use MojoDocs Background Remover: This is the ultimate fix. Our local AI mathematically separates your subject from the background and replaces the shadow with flat, pure white. It is cleaner than any physical wall.
Mistake #2: The "Selfie Arm" (Distortion)
The Error: Taking a photo with your front camera at arm's length.
Why it's rejected: Two reasons.
- Fisheye Distortion: Front cameras have wide-angle lenses. At close range (arm's length), they make your nose look 30% larger and your ears disappear behind your cheeks. This alters your biometric ratios for facial recognition.
- Asymmetrical Shoulders: When you hold the phone, one shoulder goes up, and the other goes down. Passport photos require perfectly square shoulders.
The Fix:
- Use the Back Camera (better lens).
- Set a 5-second timer and prop the phone on a shelf at eye level.
- Or, better yet, ask a friend to take it from 5 feet away, using 2x zoom.
Mistake #3: The "Hidden Eyes" (Glasses & Hair)
The Error: Wearing glasses, having hair falling over eyebrows, or heavy frames.
Why it's rejected: The eyes are the primary anchor point for facial recognition. Even clear glasses can catch a reflection from the flash, obscuring the iris.
Specific Rules:
- USA / Indian Passport: Glasses are typically BANNED. You must remove them, even if you wear them daily.
- Schengen / UK: Glasses allowed if eyes are clear, but why risk it? Just take them off.
- Hair (Aadhaar Rule): Bangs/Fringes must be swept aside. The eyebrows should be visible. In Indian Aadhaar photos, ensure both ears are visible.
Mistake #4: Wrong Crop Ratios (The PAN Card Issue)
The Error: The photo is 2x2 inches, but the face is too zoomed in (fill the frame) or too zoomed out.
Why it's rejected:
- US Rule: Head must be between 1 inch and 1.375 inches high.
- Indian PAN Card Rule: This is the most common rejection point. The algorithm looks for the Curve of the Shoulders. If you zoom in so much that only the neck is visible (no shoulders), it can be flagged as "Face Only".
The Fix: Use MojoDocs' Biometric Overlays. We project a green "Safe Zone" box.
- Keep your eyes on the top line.
- Ensure your shoulders are visible at the bottom of the frame.
Mistake #5: The "White on White" (Floating Head)
The Error: Wearing a white shirt against a white background.
Why it's rejected: The scanner cannot distinguish where your shoulders end and the background begins. This is called the "Floating Head Syndrome".
The Fix: Wear a dark, solid color. Navy Blue, Black, or Dark Grey are best. They provide high contrast and make you look professional.
Mistake #6: Heavy Jewellery & Makeup
The Error: Wearing large earrings (Jhumkas), visible necklaces, or heavy highlight makeup.
Why it's rejected:
- Jewellery: Metal reflects flash, creating white spots (glare) on the photo. Large earrings can cover the jawline edge.
- Makeup: "Highlighter" makeup makes cheeks shiny/oily in flash photography, which looks like "Hotspots" to a scanner.
The Fix: Remove jewellery. Use matte makeup or none at all.
Mistake #7: "Digital Fraud" (Filters/Retouching)
The Error: Using beauty filters, skin smoothing, or removing a mole in an app.
Why it's rejected: This is considered Identity Fraud. Your passport must look like you. If you have a scar, birthmark, or mole, it MUST be in the photo.
The Fix: Zero filters. Use good daylight to soften wrinkles naturally, but do not digitally erase them.
The "Indian Bureaucracy" Checklist
If you are applying for Indian documents, check these specifically:
- Aadhaar: Are BOTH ears visible? (Tuck hair behind ears).
- PAN Card: Are shoulders visible? Is file < 50KB?
- Passport: No white shirt! (Use a dark shirt).
- Expression: Mouth fully CLOSED. No teeth.
Conclusion
Most rejections are totally avoidable. They aren't bad luck; they are bad data. By using an intelligent, standard-aware tool like MojoDocs, you remove the guesswork.
Don't let a shadow or a pair of glasses cancel your flight. Take control of your biometrics.